Shunting Session In The Smallest Places

The waggon is tugged to the far-sided unloading point at the bumper.

It’s Gerd’s fault, again! 😉 Not long ago, he posted a beautiful video on one of his operation sessions in time lapse:

Please accept YouTube cookies to play this video. By accepting you will be accessing content from YouTube, a service provided by an external third party.

YouTube privacy policy

If you accept this notice, your choice will be saved and the page will refresh.

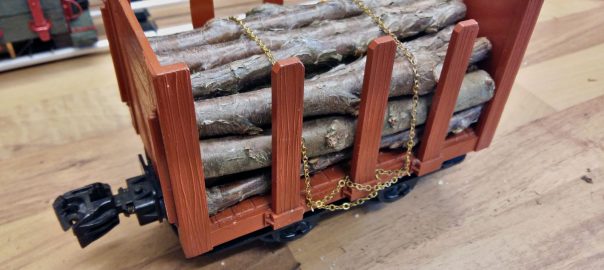
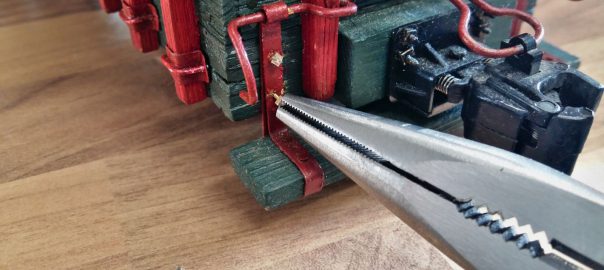
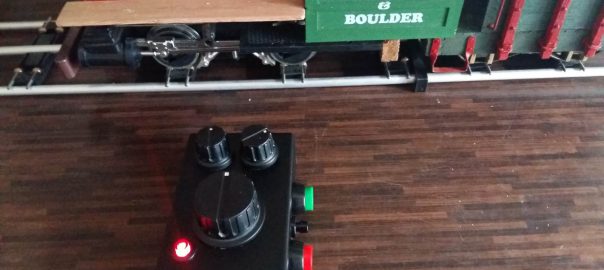
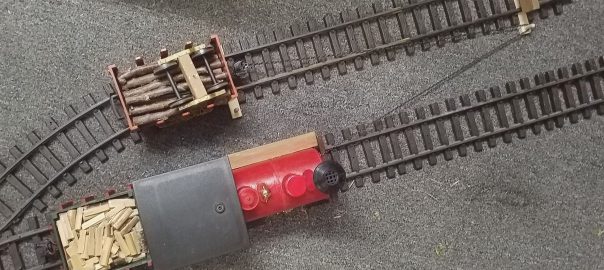
What excited me particularly was the use of a chain for shunting, at 0:38 and 5:18. So when a rainy afternoon forced me to stay in the work shop, I couldn’t resist. Within a few minutes a mini layout was patched together from snap track.

What ensued were three hour’s worth of pure shunting enjoyment. And yet another proof that fantasy and some improvasation can make up for a whole layout.

Bogies: Prototype

The first prototype is finished.

As I’ve already described, I’d like to build a consistent set of waggons to build a short train for my porter loco.  Of course, that entails waggons. Which run on bogies. Turns out, it’s not that easy to find suitable bogies for Fn3 which stay in a reasonable pricing range. So during winter 2020, I started busying myself with the construction of a bogie prototype.

A particular “thank you” goes out to Gerd, AKA “Waldbahner”, who published a nice series of posts about 5” bogies on his website. I let myself wantonly inspire by those. Extra thanks to Gerd, who kindly allowed me to use some of his pictures of his own projects.

Winter Operation Session 2020

01 Porter pulling 101 Stake Wagon.

Last Saturday, an old friend of mine and I held a small operation session at his place. The weather was fabulous, we had high temperatures for february, around 14°C and lots of sunshine.

It’s been a huge success: multiple trains running simultaneously, shunting, test drives, lots of talk on lots of topics. But most important: a train-load of fun!

Shunting Dice for Operating Sessions

Triangles glued, body painted.

The operation session which a good friend of mine and I are planning is approaching. It’s going to be a premiere in more than one aspect: we haven’t done joint operations for a long time; it’s also been a long time since we did some shunting; and we’re going to try and let children participate.

So the question stands: How can we combine interesting operations with as few rules as possible and as little preparations as possible? Enter *drumroll* the shunting dice.

Timber Cargo for Bulkhead

Loaded and secured.

In preparation for the next driving session at a friend’s of mine, I focused on Bulkhead #101. (By default, which other waggons do I possess right now?)

The little darling is supposed to serve as a coupling adapter (knuckle coupling at the front, LGB’s “bottle opener” at the rear). So that it can excel in the task, the waggon needs some additional weight, which I provided by means of a timber load. And in order to keep the latter in place, some fastening had to be added.

Porter and Tender: Coupling-Maintenance

Threaded rods are screwed into the wood.

My faithful Porter had some work to do during this winter, for which it was transported to different places: Into the garden, at my parents-in-law’s, even at work. Of course, these transports always entail boxing and unboxing into transport crates, which lead to considerable wear regarding the coupling between loco and tender on the one hand, and the conductor’s platform at the tender’s rear end on the other hand. Thus, we’re going to focus today on ever-occuring maintenance and possible improvements.

Deltang Tx22 Completion

Wiring the ground first.

After assembling the transmitter, I proceeded with soldering the parts. This turned out to be a fiddly affair, which kept me from taking pictures. In return, there’s a video of the final testing! 🙂

Overall one can say that the manufacturer’s documentation works very well. Once you’ve found your way around the diagrams and schemas, the assembly is easily done in a few hours’ worth of time.

It is really helpful to plan the wiring in levels or layers. At the bottom, I placed the ground connectors. There I connected the potentionmeters, the main switch, its LED and the bind switch. The two function switches remain untouched for the moment because after soldering they will partly block access to the potentiometer.

DelTang Tx22 Assembly

As I have already mentioned in my post on powering my porter loco with Li-Ion accus, I’d like to experiment with the DelTang system. There’s a lot of positive feedback from other model railroaders and all my requirements seem to be met – with further room for improvements.

Unfortunately, with the upcoming Brexit the demand for DelTang components has skyrocketed at the moment (meaining autumn 2019). I was lucky to get my hands on one Tx22 transmitter and two Rx65c receivers. It will suffice for the moment, but I will need further components, especially spares.

Porter: Li-Ion Test Run

After I finished the powerpack the next opportunity was seized to perform an extensive test run.

First the pack was connected to the charger and fully charged. To be on the safe side I placed the accu pack in a fireproof bowl and thanks to the fine weather I could move the whole setup into the garden. In case that a cell had been damaged, it would have spared me the troubles of toxic fumes in my workshop.

Test run under severe supervision.

All went well, so I could plug the powerpack into the existing R/C circuit. The results were stupefying: almost three hours of solid mileage with 40% capacity remaining. Now I’m convinced that I can get up to two hours of operations out of the powerpack without overtaxing it. Next step will be the assembly of the DelTang transmitter.