Thermy 4: Planning the Nose

Based on the draft stringers the new frames for the cockpit come about.

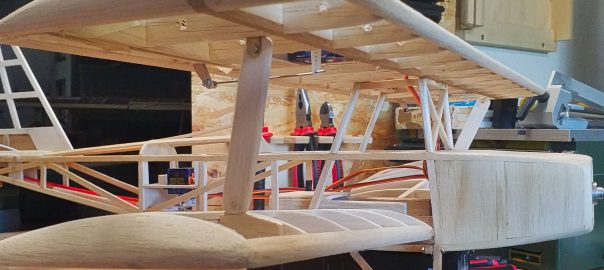
Based on the design variations, I’m moving on to the actual planning and start to blueprint the nose. If possible, it is supposed to give the aircraft a semiscale appearance and that means I basically have to start from scratch.

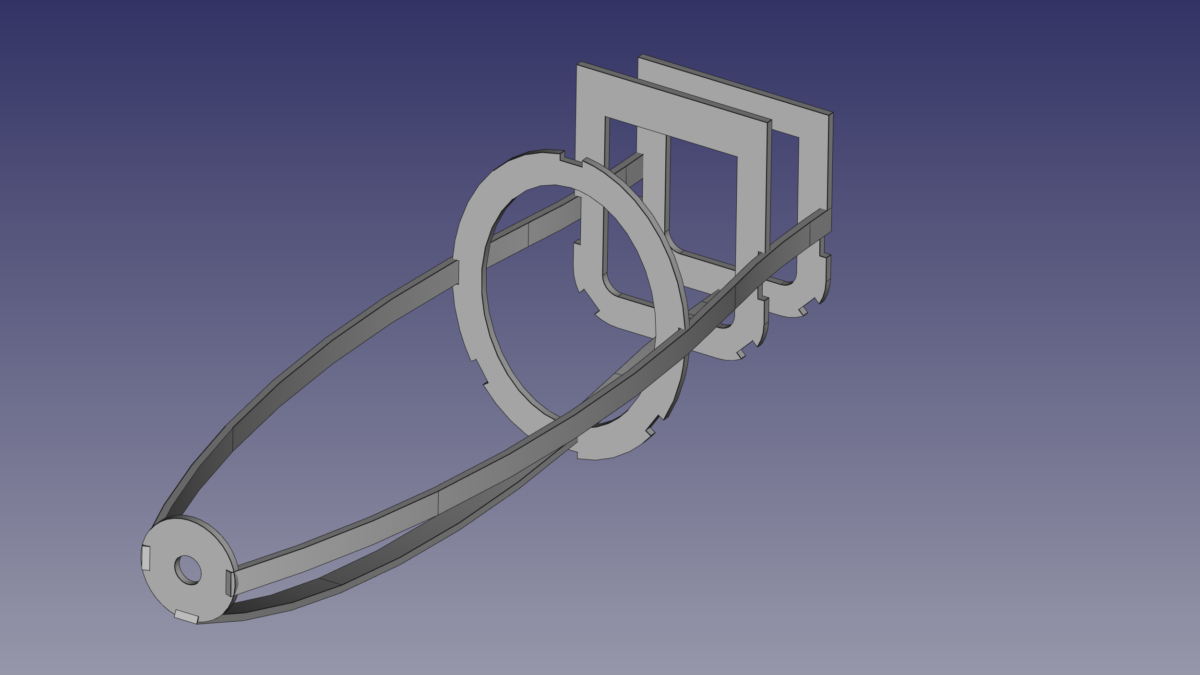
In order to create parts repetitively and precisely, the blueprinting is going to be computer-assisted. In theory I could draw on paper, scan the diagrams and print them. However, I would lack the 3D preview and applying adjustments is going to be much more time-consuming.

Workshop: Building Boards for the Thermy 4

The finished building boards stored away under the table.

In order to build the Thermy 4 I will need building boards, which are in widespread use with model aircraft builders. They serve two purposes: First they are supposed to provide an absolutely even surface because most workbenches sag over time, which means one can’t build really straight wings or fuselages on top of them. It’s easy to check it out at home, simply put a spirit level on top of the workbench and look for the gap in the middle, which one almost always will find. Second, building boards facilitate storing subassemblies while one is continuing to work at other parts. And since my workbench is frequently needed for other purposes than the current project, one doesn’t want it to be cluttered with, say, a clamped half of a fuselage.

Thermy 4: Design Modifications

As already mentioned at the start of the construction report, I’d cast an intermediary eye on the Lentus Thermik by Multiplex. I especially like its semi-scale appearance, that gives it a similar look as modern soaring planes. Most notably the bulbous nose and the T-shaped tailplane are spectacular and provide a great silhouette during flight.

Thermy 4: Make a Wish!

Since I’ve braced up and actually want to build the Thermy 4, I want to begin with getting clear about one thing: What do I actually want?

The question isn’t quite as trivial as one might think. I’m planning big on this airplane. That is, I want to incorporate as many features and wishes as possible because I hope to keep this bird flying for the rest of my life. So today is about the demands that I’ve got for this model.

New Construction Report: Thermy 4

In March 2019 I happened onto an issue of the FMT, which included the first part of the diagrams for the Thermy 4. Right away, I knew: That’s what I’ve been looking for!

Thermy 4 with its constructor, Wolfgang Werlich.

The model incorporates everything what I’ve wished for: great wingspan (4 metres), take-off weight below 5 kilograms so it’s legal to fly outside of model aerodromes, flaps and an electric motor, enough space for own, further ideas.

Now, after two years of wavering and brooding, it’s finally on. With this new construction report I will try and document my attempt to build my own, larger sailplane.

Joyrider: Maiden Flight

And up into the air she goes!

After the first Center-of-Gravity tests my expectations have been thoroughly adjusted. I have to admit, at the beginning of this project I didn’t waste a thought on a possible failure. Meanwhile, the Maiden flight has become some sort of obstacle to me.

During the last weeks I’ve tried to accomodate weather, family and interested friends while taking patience and easing my doubts. That piled up too high: now or never!

A short remark: My wife thankfully took some video footage. However my PC has quit service, so I can’t postprocess. I will hand in the videos as soon as a new PC is at hand. Meanwhile, some still images will have to do.

Joyrider: Setbacks and Corrections

After a failed center-of-gravity test.

Finishing the covering was another milestone for me and I was very confident that the maiden flight would turn out just fine.
Then the first complete assembly came along and with it some new challenges. Namely undercarriage and center of gravity.

New Project: Aerial Footage

The EasyGlider in its element.

Alright, you got me: I’m talking about more than just aerial photography, but about footage made from the ground, too. But first things first.

As I’ve already outlined, I’m an active R/C pilot again since august 2018 and I’ve started to scratch-build a biplane in 2019, too. I ‘ve managed to post about the latter over the last few months and I do hope that some readers had fun reading those posts and maybe could even learn something useful from it.

However, the flying season is about to kick off in earnest. Of course, I want to fly and at the latest after the biplane is finished, I (hopefully!) won’t spend much time in the workshop. So what to post about here?

Joyrider: Covering

The upper wing's mounting, the undercarriage's mounting and the seatback are finished.

After the details are finished I can finally focus on the covering. Some model builders seem to regard covering as an irksome work and necesarry evil, but I actually enjoy it. To me it’s like a metamorphosis: the bare framing of the aicraft, as pretty as it is, equals a caterpillar, which is yet to become a butterfly.

Nonetheless it’s a lot of work all the more if one wants to get a creases-free result. In the process, I didn’t manage to take a lot of pictures, but I’d like to give an example and point out some crucial points.

Joyrider: Last Details

Upper and lower wing are now linked with each other.

By finishing the linkage the out-fitting has come to and end an I can take care of the last details. Those cover two areas: the fuselage and the wings.

The fuselage needs a couple of maintenance hatches in order to easily gain access to the drive unit, and the tailplane’s servos and fixture. The fuselages’ belly needs to get reinforced, too. And last but not least I’d like to add some details to the nose.

The wings need an additional strutting in order to stabilize the lower wings. And it will surely add to the good looks.